How To Never Ever Lose Your Mouse Pointer Ever Again!

Well on Windows at Least…

Sometimes it seems that the mouse pointer gets lost somewhere on your desktop screens becoming like a needle in a haystack. No matter how many times you scan your screen, you can’t find it at all. It almost seems like it magically disappeared. No matter how much violently you move your mouse around, there’s no sign of the moving arrow anywhere.

Mouse Settings

Open Mouse Settings Configuration Dialog

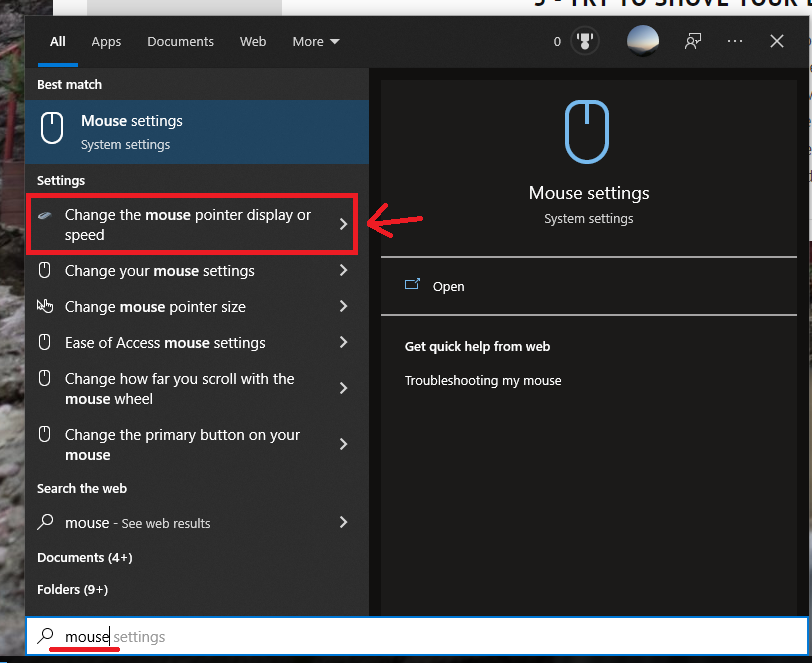
Open the Start Menu and search for “Mouse”. Then select the second option “Change the mouse pointer display or speed”. The “Mouse Properties” dialog will show up.

Make the Control Key Help You Locate the Pointer

Under the Pointer Options tab, check and enable the “Show location of pointer when I press the CTRL key” option.

Now, when press the Control Key, an animated circle will appear around your pointer.

Don’t Hide the Cursor When Typing

When typing, the cursor will disappear no matter where it is. It will only appear if you move the cursor out of the typing window. This can be fixed by unchecking and disabling the “Hide pointer while typing” option

Pointer Trails

The pointer trails generate a really cool effect where the mouse leaves old shadows of itself. Though it’s a matter of taste if you like the effect or not. Simply enable and check “Display pointer trails”

The effect will look like this.

Make the Mouse Pointer Stand Out

The default colour for the mouse pointer in Windows is white. Since most content such as documents and web pages have a white background, the pointer blends in well. Windows allows you to pick a pointer style that is always the inverse of the background colour.

Under the Pointers tab select the “Windows Inverted (system scheme)” Scheme in the drop down.

The increased contrast will make it easier to locate the pointer. Even if you know where it is.

Make The Pointer Bigger

In the list in the dialog you saw above, you can also select “extra large” and “large” which will make your cursor larger and hopefully easier to see.

With these simple tricks, you’ll hopefully save yourself the headache of locating the pointer. Never lose it again!

Build a (Poor Man's) Arcade Machine - On a Budget of 200$ or Less!

I was watching a bunch of YouTubers who were creating arcade machines from scratch. What they did was really impressive but I didn’t have the handyman skills or equipment (or money) to match them. I still wanted to make a game machine however and ignore how scrappy it is. Whatever it ends up, I’ll be proud of my work. It’s all about improvisation anyways, right?

My goal was to build an arcade machine (that didn’t look like one) with things that I already have avoiding buying new parts. A rummage in the basement storage locker presented me with quite some surprises. I’m encouraging you to use as much as what you already have.

Just because you’re on a tight budget, doesn’t mean you can’t have fun. We’re stretching it thin and keeping the total cost under 200$. That’s much less than experts who spend thousands of dollar on tools, wood, expensive TVs, arcade controls and so on. I, in some way, envy them because looking at these builds make me feel skilless (and poor).

Keep in mind that this budget is for the minimum required to build a working machine. You may opt for higher end parts or have many of them already lying around. I personally didn’t have to make any new purchases since I had the components needed.

Let’s take a look about how you may find yourself into the way of fun without overdrawing your account.

The Parts You Need

The Computer

Obviously, you’ll need something to actually run your arcade machine and run the emulators and ROMs so you can play them. A local store, The Trailing Edge, sells refurbished PCs that office businesses discarded them. They had a pretty old machine that was priced for just under 100$. The reason I had it was for testing my software on a slower and older machines to see how it performed. I no longer needed it when virtual machines had support for reducing the execution cap thus emulating a slower machine. It sat in my closet doing nothing and collecting dust.

Some much cheaper alternatives are Raspberry Pi Boards. They provide a very compact system that is very inconspicuous and silent. These systems have become powerful enough to run retro games with no fuss. There are other single-board computers for about the same prices but I prefer the RPI because it’s the most popular one and has the best software support.

Don’t forget to check eBay for refurbished laptop and desktop computers for a very cheap price. You don’t need anything more powerful than a Celeron processor and 4GB of RAM. You could probably get away even less.

Check you’re existing inventory of computer devices. Over the years I’ve purchased many Raspberry PIs and single-board computers hidden in messes of drawers. Some old laptops were hanging around too but I’ve sold most of them.

Cost: 35$ - Raspberry Pi 4 Model B (1GB RAM)

The Software

Emulator front-ends have developed beautiful interfaces and easy setup. There’s so many choices and I’ll only list a few. Keep in mind setup can be a bit clunky and keep the official documentation handy and don’t be afraid to ask online for some advice.

If you’re using a PC, my favourite frontend is without a doubt LaunchBox/BigBox. It does cost some money but I already had purchased a license for my HTPC. There are some free alternatives with beautiful UIs such as Lutris and Playnite. There’s also EmulationStation which is very popular with Raspberry Pi users.

The games themselves are not that hard to find on the Internet but there’s huge moral concerns over obtaining them. While owning the game is usually enough, some take it far and dump the ROMs from the cartridges. Both solutions are expensive and it seems unreasonable that you’ll be chased around for software that’s more than 30 years old (unless you’re Nintendo).

One advantage of using a PC is that you can include other games such as your collection from Steam or whatever else you may have. Of course, the limited performance of these puny single-board machines that you got your hands on might not be able to play more demanding and serious games.

In the Gems section on this website, in the Piracy section at the bottom, you’ll find ways to obtain these ROMs. I’m also making a shameless plug for my curated ROM collection TopRoms which will shrink the footprint of having every game in existence rather than just the popular and high quality ones.

Of course, the frontends can’t actually run the game. While some projects like RetroPie and Recalbox will already have emulators configured other software will require you to download an emulator yourself. RetroArch is currently the most popular multi-emulator software with great compatibility and performance. One thing you’ll need to keep in mind, there’s a lot of manual setup to get things working properly so you’ll need to be stuck with documentation and using online queries.

The emulators and frontends currently available have never made it easy to get things up and running. The technical nature of these software caters more to those who have a good understanding of computing in general.

Of course, you can use the operating system of choice whether it’s Windows or Linux. Take a peek at AlternativeTo find the software that works for you.

Cost: 0$ - RetroPie

The screen

Many business are putting away their screens for something bigger and maybe better quality. Although virtually every monitor on sale these days are 16:9, this can be a little jarring since most classic games run at 4:3 aspect ratio. So the extra wide screen space won’t be useful.

There are many places where you can find cheap monitors for very low prices. Checkout liquidation centres, thrift stores and eBay. You may find something that costs less than 40$.

Personally, the monitor I had was a hand me down. It’s 10 years old now but It still works well. One frustration is that I lost the base for the screen and had to secure it by improvising with book ends and sticky tac.

Some purists may prefer CRT screens since they provide better response times and keep that authentic look because these older games were designed to run on them. You’ll usually find on them on classified ranging from free to unusually expensive prices.

One last thing to keep in mind, it’s likely that you’ll be standing while playing on the machine. As a result, the screen needs to be tilted very far back, almost at a 45 degree angle. It’s possible your screen stand that doesn’t move that far so be ready to improvise.

Cost: 35$ - Refurbished 17” Monitors

The Controllers:

I have to admit that controllers can make or break the gaming experience. So perhaps this is a place you can spend a bit more money. You can find cheap ones all over. In my opinion, the best bang for your buck is the Logitech F310. The buttons are firm, the D-pad reasonable and some nice shoulder buttons. Taking a quick at local stores, you can obtain one for 25$. If want something wireless, you might be paying double. But, if you want that authentic arcade experience, you’ll have to shell over 200$ for arcade style controls or buy a DIY kit which is only a bit less. I personally had some 8BitDo classic controllers lying around unused so they got connected to the PC.

Cost: 2x25$ - Logitech F310 Gamepad

Keyboard and Mouse

It’s almost certain that you have some old keyboards and mice lying around in a closet or storage room. You really don’t need anything fancy for the seldom cases where you need to configure the machine.

Look at local stores, thrift shops and liquidation centres. You can probably find a combo for less than 5$. The feel and accuracy of the mice and keyboard might leave quite a bit left to desire but it will enough for the rare times you will use it.

Another alternative is the air-mouse/keyboard combo that many HTPC enthusiasts use. I had two lying around from old HTPC projects. Finding one for less than 30$ is not impossible though.

Cost: 15$ - iCAN Keyboard and Mouse Combo

The Speakers

An acceptable set of PC speakers can be found for as low as 25$. You can also use Bluetooth speakers if you have one that you’re not using. Your screen may even have built-in speakers. The sound quality doesn’t have to be amazing, just enough to transmit the bleeps-and-bloops from our beloved classic games.

Cost: 22$ - AmazonBasics USB-powered Speakers

The Stand

This is the part where you probably have the most freedom. A quick look through Amazon and Ikea reveals many candidates for keeping your machine off the ground. Try finding high dining tables with casters, a small desk, a tall chair and so on. You’ll find furniture everywhere from thrift stores, to IKEA and many other places selling cheap furniture.

I personally used a sofa table with casters to keep things up. I was planning to use it for eating on the couch but it was too high. So it found new use after some minor changes.

Cost: 33$ - Furinno Just 3-Tier Turn-N-Tube End Table

The Odds and Ends

Remember you’ll need cables and power strips to get everything tied together. Some cable management ties might help keep your system clean. I tend to collect cables and I was able to find everything I needed. Otherwise head out to various online stores like Amazon and Monoprice and so on. Also take a peek at dollar stores.

Conclusion

There we have it folks, the total comes to almost exactly 200$ (192$). Taxes and shipping were not included since they vary based on your location. If you’re reading this blog post, you’re probably a technology nut like me having wasted much money on things that became useless and obsolete quickly. Anything that you’re not using is an opportunity to save money and reuse something that was destined for the electronics recycler.

This is what my system looks like after completion. It looks like a hack job but it does exactly what I need it to do, play games!

However, don’t forget to add your magic touch to your build and keep the pride of what you have managed to do on a shoestring budget. 

Feel free to share in the comments below what kind of setup you have managed to build. It would be awesome to share pictures of your masterpieces whether it was a glued together rush job or a fully fledged arcade cabinet. There’s no floor or limit here.

Bringing a Taste of Linux to Windows

For a good part of my life, I was a Linux zealot. I preached it like I was preaching a religion. I felt superior to others because I could handle something so daunting and intimidating. I realized that most of my day was spent configuring the operating system rather than actually getting work done. As my responsibilities in life grew and my career as well, I didn’t have time anymore to deal with all the shenanigans and challenges that this operating system brought to my life.

Eventually, I got disillusioned with Linux and was tired of wrestling with it because the new update just borked my GPU drivers once again being presented with a black screen when booting up my system. I had to sift through documentation and wikis for hours to find out a solution and since I only owned one system, I had to relegate myself to my phone’s tiny screen. I was done. I made some backups and wiped everything out for a Windows 10 install.

Linux has spoiled me quite a bit and I got used to some its applications, features and quirks. Moving to Windows created some gaps in my workflow that I felt slowing and holding me down. Going back to Redmond’s offering has forced me to search extensively for software that would fill in these holes requiring quite some experimentation.

(Keep in mind the Headings can be clicked to go to the application’s website)

Windows Subsystem for Linux

The confusing name for WSL made it hard to understand what this feature was for the one who was uninitiated. However, Linux started to become an infatuation at Redmond and they became to embrace it starting with Azure. Windows 10 brought the surprise that I would be finally able to run my favourite Linux tools without needing a virtual machine and complex setup of shared folders. It was light and fast. Basically, WSL is Wine backwards: it runs Linux ELF binaries translating the Linux API calls into equivalent Windows NT ones.

All the beautiful Unix commands were finally available to prune through files easily, automate tasks and of course use magical tools to deal with obscure situations. You could even pick what distro WSL would run. I just picked Ubuntu because it provided a polished bash experience alongside a great package manager APT for pulling in your favourite packages and building your arsenal.

Shortly after, I customized it a bit by installing ZSH and doing various tweaks to make it just perfect for me. However, the built-in Windows terminal emulator left a lot to be desired and have a good solution:

ConEmu

I have no memory of how I discovered this tool however it was quite the revelation. It rendered the colours and symbols that Linux command line tools used. You could choose to start the shell you wanted even in administrator mode. The great Quake-style dropdown was available. And of course, a nice tiling functionality reminding you of your good old days in awesome tiling window managers. Tabs were not left out either.

You can even have ConEmu be part of your context menu so you can launch it straight from explorer.

Admittedly, the keyboard shortcuts are clunky and quite the mess, thus making them harder to remember. There’s so much to customize like colour themes, fonts and way more, but the settings window is a bit hard to decipher and quite difficult to navigate. I guess that’s the price you pay for all that customizability.

AutoHotkey

Linux’s probably most powerful feature is scripting. There are so many command line tools and APIs that you could create the most sophisticated scripts that did exactly what you wanted. Want to download a YouTube video on your hard drive? You’re covered. Need to rearrange displays when plugging in your dock? You got it. What about starting a bunch of applications per workflow? You’re set.

This is where AutoHotkey comes in, bringing the ability to automatic tasks via a huge swath of commands available at your disposal. Whether you want to move your pointer to the center of the screen or have a keyboard command bring up your note taking application. It’s all possible

Just like when scripting in Linux using bash or python, there’s quite a steep learning curve to get a hold of the power of this beast. Thankfully, the official documentation is excellent and like always, there are forums and stackoverflow to save you.

I personally use AutoHotkey to switch between applications and start the terminal. I don’t have ideas yet on what else I can do, but I don’t doubt that this scripting language will allow me to do whatever I need to suit my workflow.

Divvy

In my opinion, the biggest showpiece that Linux has was tiling window mangers. It was a whole paradigm shift from floating windows to making them well organized and neatly stacked. My favourite WM was definitely i3 because of it’s ease of use and intuitive way of tiling windows. It was well tested and easy to configure as well.

When I left Linux land, I had to content with a disorganized mess of floating windows again. There was some honorable attempts (such as b3 and bug.n) at porting them to Windows but they were clunky and often didn’t work seamlessly. The truth is, the APIs on Windows for manipulating windows is quite complicated and often generated inconsistent results. The poor developers had to content themselves with these trying to shoehorn the power of tiling managers into an operating system that just couldn’t accept it and clearly wasn’t made for it.

In comes Divvy, a piece of software a friend introduced to me many years ago. Although it didn’t automatically tile the windows for you, you were able to organize your windows into tiles by selecting the area of the screen you wanted to fill. It’s very intuitive and quite customizable such as adjusting the size of the tiles and their count. You can even have gaps between the tiles. A featured so loved by /r/unixporn users who ran a modified version of i3 called i3-gaps.

Now, my desktop can be organized but unfortunately, I have to do it manually. It’s not bug free either sometimes windows not being moved or resized properly.

Groupy

A feature that I fell in love with was provided by the lightweight window manager Fluxbox. You could merge multiple windows into a single title bar being able to switch them just like you would switch tabs in a web browser. This really helped with the mess experienced by floating window managers and provided more comfort.

I knew Stardock for it’s amazing customization tools bring powerful features to the Windows Desktop. I often kept an eye on their new releases and played around with what they had.

Groupy is one of their more recent creations. It allows Windows to be groups in tabs cleaning up your desktop quite a bit. You chose how you organized your windows whether it was by application type or easy workflow switching.

Unlike many of the other available solutions, Groupy looks clean and professional with a bit of configurability such minor appearance tweaks and keyboard shortcuts. It’s very intuitive: you simply drag a title bar of one window to another and that’s it. You have merged two windows into a tab.

Conclusion

These were a sampling of applications that brought creature comforts of Linux into Windows. I still think that Linux is awesome and use it extensively in VMWare for web servers and deploying software for those I work with. Every year is the year of the Linux Desktop but I don’t think we’ll ever get there. At this point, in terms of the general public, Windows and macOS own 100% of the desktop market share.

One plug and shout-out to AlternativeTo that helped me find equivalent applications for both Linux and Windows.

Please share your ideas on this topic in the comment sections below. Are you still a Linux user who managed to make a living out of it and comfortable with the OS? Or have you moved to another OS?

How to fix a Linux computer according to the Oatmeal